|
<< Click to Display Table of Contents >> The Main Screen |
  
|
|
<< Click to Display Table of Contents >> The Main Screen |
  
|
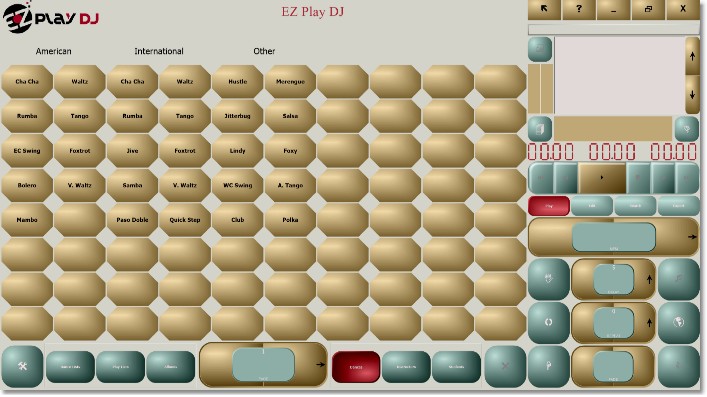
The Main Screen is your command central. It remains visible the entire time that the EZ Play DJ is running. Other screens may come and go as needed, appearing on top of the Main Screen, but the Main Screen stays.
Dance Buttons
Most of the Main Screen contains Dance Buttons. , The Main Screen displays 15 or 80 Damce Buttonsuttons per page. The number of Dance Buttons on the screen can be set on the Options Screen.
Each one brings up a Select Song Screen. Note that there are 30 dance buttons on the screen. The 30 or 80 buttons shown on the screen comprise Page 1 of the Dance Buttons. But there can be two, three, or more pages.
A Dance button is labeled with the name of a particular dance (e.g., Waltz), but can also have as its label the name of an Artist (e.g., The Rolling Stones) or with any other category (e.g., Oldies).
Page Control
At the bottom of the Main Screen and to the left of the button labeled 'Dances' is the Page Control. It has three buttons. It is used for navigation among the various pages of Dance Buttons. Press the button on the left to go to the previous page, and press the button on the right to go to the next page. The page number is displayed in the center button.
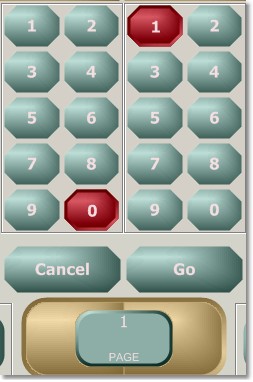
If you press the center button the Quick Navigation control will appear. This enables you to go directly to a page. Just enter the page number, from 01 to 99, and click on the button labeled 'Go' to go directly to the page. You can close the control by pressing the 'Cancel' button.
Playlist and Multimedia Control
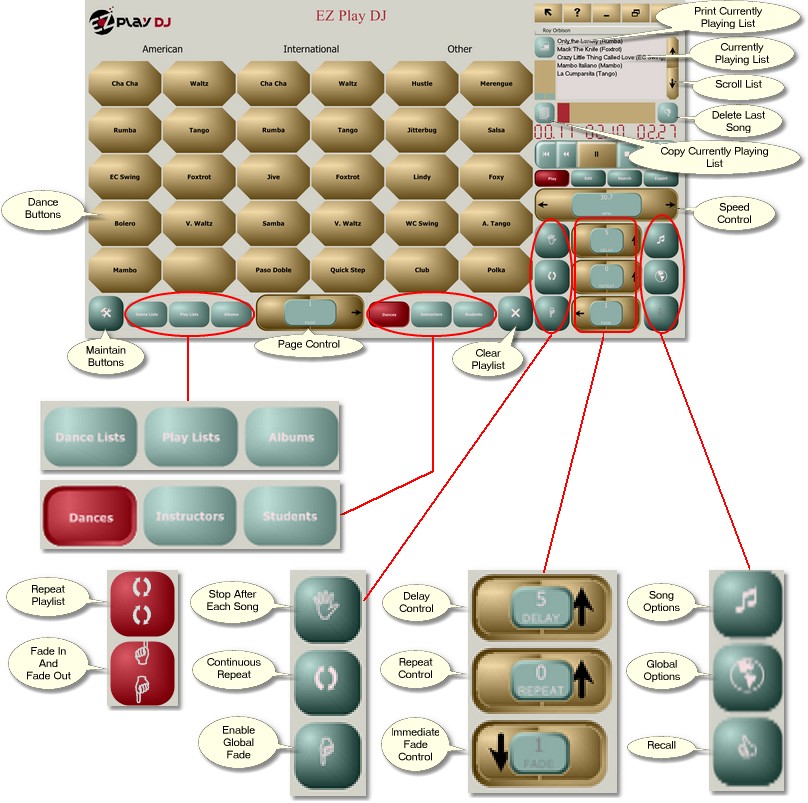
In the upper right corner of the Main Screen is the Playlist. Each song selected on the Select Song Screen is added at the bottom of the Playlist, and when a song finishes playing, it is removed from the top. The control beneath the Playlist, which has five buttons labeled like the buttons on a CD player, enables you to play, pause, stop, rewind, rewind to beginning, fast forward, and fast forward to the beginning.
Between the Playlist and the Multimedia Control are three digital displays. The one on the left is the number of seconds that the song has played so far. The one in the middle is the number of seconds remaining, and the one on the right is the total play time.
Speed Control
Immediately below the Multimedia Control is the Speed Control. It has three parts -- a button on the left, a display panel in the center, and a button on the right. Press the button on the left to slow the song down, and press the button on the right to speed it up. The speed is displayed in the display panel as a percent of offset from normal speed, as beats per minute, or as measures per minute..
Speed offset percent can be locked so that the setting is carried over from one song to the next. Let's say you are teaching a rumba class for beginners. You want to play all rumbas at 28 measures per minutes (MPM). First load the playlist with rumbas, then set the MPM to 28 for the first one. Press the center button on the speed control. It will turn red, indicating that the MPM is locked. Then all the rest of the songs in the playlist will play at 28 MPM (assuming that each has a properly calibrated tempo).
You can also lock beats per minute. This is handy of you have a mixture of songs with different beats per measure in your playlist, like waltzes (3 beats per measure) and foxtrots (4 beats per measure).
Delay Control
Immediately below the Speed Control is the Delay Control. It has three parts -- a button on the left, a button in the center, and a button on the right. It is used to set the number of seconds that the EZ Play DJ pauses after finishing a song before it plays the next one on the playlist.. Press the button on the left to decrease the delay, and press the button on the right to increase it. The number of seconds between songs is displayed on the center button. The increment for the delay control (1, 2, 3, 4, or 5 seconds) can be set on the Options Screen.
The delay set by the Delay Control also controls the delay before starting the first song in the Currently Playing List or restarting a song that has been paused or rewound. This feature can be toggled on or off on the Options Screen.
Press the button in the center to toggle the delay on or off. When delay is enabled, the button will be red.
Repeat Control
Immediately below the Delay Control is the Repeat Control. It has three parts -- a button on the left, a button in the center, and a button on the right. It is used to set the number of times that the EZ Play DJ plays a song before moving to the next one on the playlist.. Press the button on the left to decrease the number of repetitions, and press the button on the right to increase it. The number of repetitions remaining is displayed in the center button. This control is overridden by the Continuous Repeat Button.
Press the button in the center to toggle the repeat on or off. When repeat is enabled, the button will be red.
Immediate Fade Control
Immediately below the Repeat Control is the Immediate Fade Control. It has three parts -- a button on the left, a display panel in the center, and a button on the right. It is used to reduce the volume by about half or to bring it back up. The control can also be used to take the volume down to zero and end the song.
Press the button on the left to decrease volume, and press the button on the right to increase it. The level of the volume after it is decreased can be set on the Options Screen. Press the button on the left twice to take the volume down to zero and end the song. The display panel will show '1' if the EZ Play DJ is playing at full volume and a percent of full volume if the volume has been decreased part way.
Fade options can also be set globally or by song. (See the Song Settings Screen and the Options Screen).
Copy Playlist Button
At the lower left corner of the Playlist is the Copy Playlist Button. On this button is the symbol 4. Press this button to copy all of the songs in the Playlist. On either the Select Song Screen or on the Playlist Songs Screen you will be able to paste these songs. This provides an easy way to create an editable playlist.
Print Playlist Button
At the upper left corner of the Playlist is the Print Playlist Button. On this button is the symbol Ê. Press this button and the Print Playlist Screen will appear. On that screen you can edit, save, or print the Playlist.
Scroll Playlist Control
To the right of the Playlist are two buttons, with up and down arrows. These buttons are used to scroll the Playlist up or down. When you scroll up each song that rolls off the top of the Playlist is added at the bottom. When you scroll down each song that rolls off the bottom of the Playlist reappears at the top. When you are done scrolling and press the play button the song at the top will be played.
Delete Last Song Button
At the lower right corner of the Playlist is the Delete Last Song Button. On this button is the symbol D. Press this button to delete the last song in the Playlist if there are two or more songs in the Playlist.
Stop after Each Song Button
To the left of the Delay Control is the Stop after Each Song Button. On this button is the symbol I. When this feature is not enabled, the EZ Play DJ will automatically start playing a song when the previous song in the playlist is finished. When this feature is enabled, it is necessary to press the Play button, which is one of the five buttons on the Multimedia Control, to start playing the next song.
Press this button to toggle this feature on or off. When Stop after Each Song is enabled, the button will be red.
Continuous Repeat Button
To the left of the Repeat Control is the Continuous Repeat Button. On this button are one or two of the symbol q. When this feature is not enabled, the EZ Play DJ will automatically start playing the next song when the previous song in the playlist is finished. When this feature is enabled with one symbol on the button, it will replay the song which has just finished playing.
When this feature is enabled with two symbols on the button, it will replay the entire playlist. It accomplishes this by adding the song to the bottom of the playlist when it finishes playing.
This control overrides the Repeat Control..
Press this button to toggle this feature on or off. When Continuous Repeat is enabled, the button will be red.
Enable Global Fade Button
To the left of the Immediate Fade Control is the Enable Global Fade Button. On this button is the symbol H, the symbol G, or both Fade In and Fade Out options can be set globally. Fade Out options can also be set by song. (See the Song Settings Screen and the Options Screen). This button enables or disables the global fade options.
Press this button to toggle this feature on or off. When Global Fade is enabled, the button will be red. The finger pointing up signifies Fade In, and the finger pointing down symbolizes Fade Out.
Song Settings Button
To the right of the Delay Control is the Song Settings Button. On this button is the symbol ¯. Press this button to open the Song Settings Screen. This screen is used to set options for the song at the top of the playlist. The button is operable only if there is at least one song in the playlist.
Global Options Button
To the right of the Repeat Control is the Global Options Button. On this button is the symbol þ. Press this button to open the Options Screen. This screen is used to set global options.
The Options Screen has a feature to warn of questionable settings by popping up a warning and turning the button red. On the Main Screen the Global Options Button will be red if any of the buttons on the Options Screen is red.
Recall Button
To the right of the Immediate Fade Control is the Recall Button. On this button is the symbol C. If you want to repeat the song which has just finished playing, but the next song in the playlist has already started playing, press this button. The song which has just finished playing will be added to the playlist just below the song which is currently playing.
Edit Button
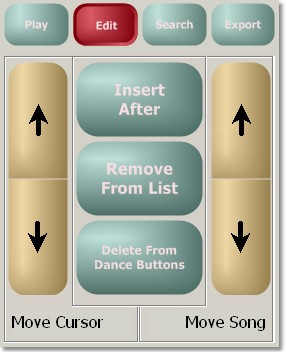
Just above the Speed Control is a row of buttons labeled Play, Edit, Search, and Export. Press the Edit button to bring up the controls for editing the Currently Playing List. The song at the top will be selected initially. You can change which song is selected by using the arrows to the left. Once you have selected the song you want to affect, you can insert other songs after it, remove it from the Currently Playing List, or remove it from both the Currently Playing List and from all Dance Buttons. You can also move it up or down in the Currently Playing List using the arrows to the right.
Search Button
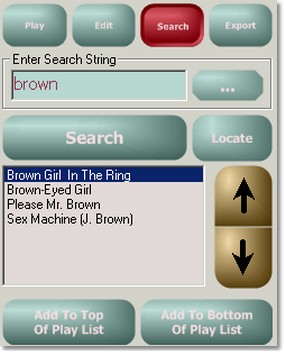
Just to the right of the Edit Button is the Search Button. Press the Search button to bring up the controls for searching for a song by title or artist. Enter your search string into the box then press the big button labeled Search and the matching songs will appear in the list. Use the arrows to select the desired song, then press one of the Add To buttons to add the song to the top or bottom of the Currently Playing List.
If you don't know the exact spelling of the title or artist you can use the percent symbol within the search string as a wild card symbol. For example, entering the search string 's%tra' will return all songs with 'Sinatra' as the artist, and will also bring up the song 'Soul Train'. Click the button labeled 'Locate' to find which button has the selected song.
Export Button
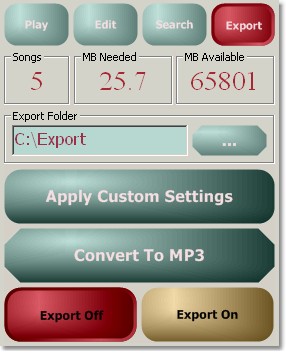
Just to the right of the Search Button is the Export Button. Press the Export button to bring up the controls for exporting songs to the disk, with or without custom settings, like speed change without pitch change or like fading the song out after two minutes. First enter the name of the folder into which the exported songs are to be stored, then select either 'Apply Custom Settings' or 'Save Unchanged' on the button below the folder name.
Then, on the button below that, select the format for the exported song file.
Add the songs that you want to export to the Currently Playing List. Stop the song at the top from playing and rewind it. The Export On button is not enabled if a song is playing. Press the Export on button to enable export, then start playback of the songs.
If you want to stop the export press the button labeled 'Export Off'. Export will turn itself automatically when the last song in the Currently Playing List has finished playing.
The Dance Lists, Playlists, Albums, Dances, Instructors, and Students Buttons
The first three of these buttons are to the left of the Page Control, and the last three are to the right of the Page Control. The selected button is red.
oIf you press the Dance Lists Button, the buttons will be replaced by thirty Dance List Buttons.
oIf you press the Playlists Button, the buttons will be replaced by thirty Playlist Buttons.
oIf you press the Albums Button and the buttons will be replaced by twenty Album Buttons.
oIf you press the Dance Lists Button, the buttons will be replaced by thirty Dance Buttons.
oIf you press the Instructors Button, the buttons will be replaced by thirty Instructor Buttons.
oIf you press the Students Button, the buttons will be replaced by thirty Student Buttons.
When a Dance, Album, Instructor, or Student Button on the Main Screen pressed, it brings up a Select Song Screen.
The Maintain Buttons Button
The Maintain Buttons button is located in the lower left corner of the screen. The six buttons described above control what screen is opened when the Maintain Buttons button is pressed.
oIf the Maintain Dance Lists Button is selected the Maintain Dance Lists Screen is opened.
oIf the Maintain Playlists Button is selected the Maintain Playlists Screen is opened.
oIf the Maintain Albums Button is selected the Maintain Albums Screen is opened.
oIf the Maintain Dances Button is selected the Maintain Dances Screen is opened.
oIf the Maintain Instructors Button is selected the Maintain Instructors Screen is opened.
oIf the Maintain Students Button is selected the Maintain Students Screen is opened.
The Clear Playlist Button
The Maintain Buttons button is located to the right of the Students button. If you press it and no song is currently playing, all songs will be removed from the Playlist. If you press it and a song is currently playing, all songs except the currently playing song will be removed from the playlist.
Title at the Top of the Screen
When delivered, the EZ Play DJ has at the top of the Main Screen the words 'EZ Play DJ' in large letters. You can change that to the name of your studio or to whatever you want (as long as it fits!). You can change it by tapping on the words twice in rapid succession (or double-clicking if you have a mouse connected). This will bring up the Keyboard Screen, and you can change the title there.
Then click the button labeled 'OK', and the title will be changed.
Resizing the Main Screen
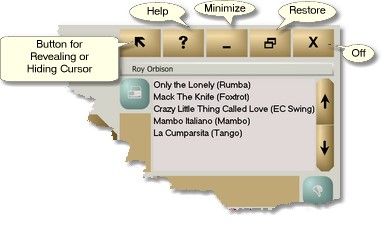
Use the Minimize, Restore/Maximize buttons in the upper right corner of the Main Screen to change the screen size.
The Off Button
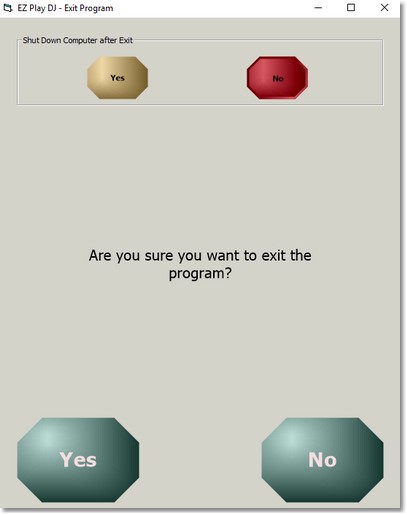
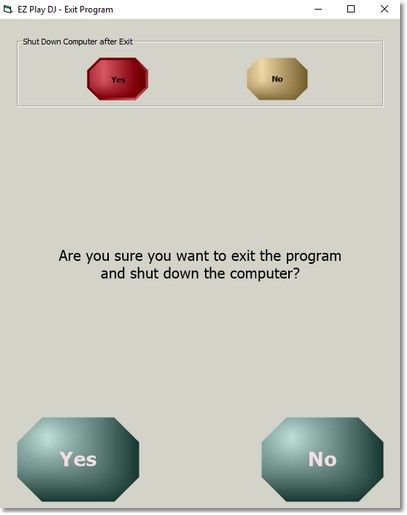
Use the Off button in the upper right corner of the Main Screen to stop the EZ Play DJ. This screen opens up. Its appearance depends upon whether the Shut Down Computer after Exit setting at the top of the screen is set to 'Yes' or 'No'. If it is set to Yes the computer will shut itself down if the button at the bottom of the screen labeled 'Yes' is pressed.
The Help Button
To the left of the Minimize button is the Help Button. On this button is the symbol ?. Press this button to open the online Help file.
Turning the Mouse Cursor On and Off
The EZ Play DJ can be controlled with either a Mouse or a Touchscreen. If both are present, both will work. That is, clicking on a button on the screen with the mouse will have the same effect as pressing the button on a touchscreen with your finger. One difference between using a touchscreen and using a mouse is that you probably don't want to see the mouse cursor (the arrow) when you are using a touchscreen, but you definitely need it when you use a mouse. If you use a Touchscreen, you can make the Mouse Cursor (the Arrow) invisible.
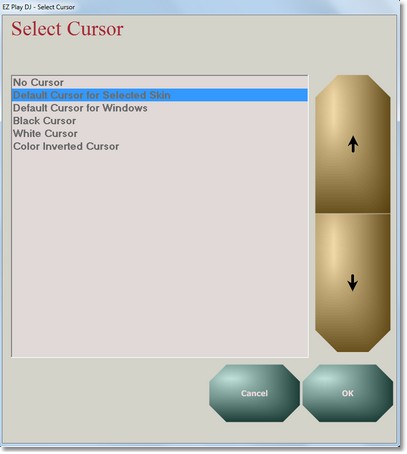
To the left of the Help button is a button with an arrow on it. Pressing that button or clicking on it with a mouse will open the Select Cursor Screen. In the event that the mouse cursor is off and you are using a mouse, you can find the button by moving the mouse around until the button changes color (to red). Then the mouse cursor (even though it is invisible) is over the button, and you can click on the button with the mouse to open the Select Cursor Screen. There is another way to open the Select Cursor Screen -- just right click with your mouse on the Main Screen.
You can choose no cursor, the default cursor for the skin, the system cursor that Windows® uses, a black cursor, a white cursor, or a color-inverted cursor. The system cursor that Windows® uses can be large, small, animated, or whatever you have installed on your computer.
