|
<< Click to Display Table of Contents >> The Select Song Screen |
  
|
|
<< Click to Display Table of Contents >> The Select Song Screen |
  
|
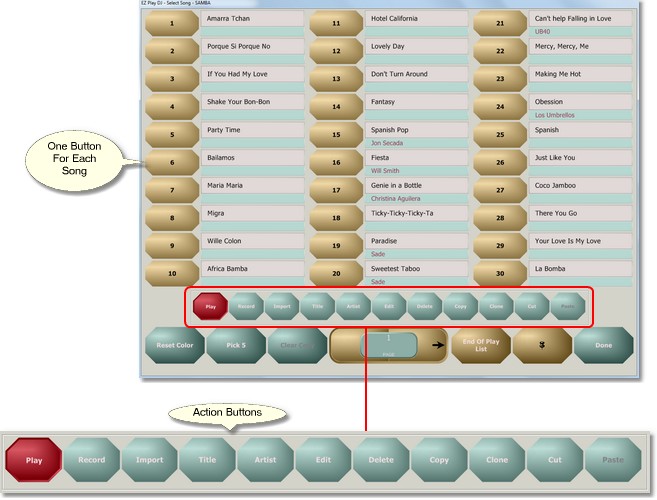
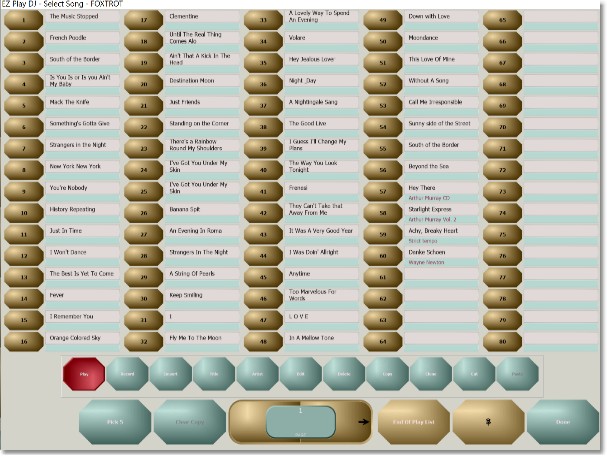
When a Dance, Album, Instructor, or Student Button on the Main Screen is pressed, it brings up a Select Song Screen. Songs loaded into the EZ Play DJ can be added to the Playlist on the Main Screen from the Select Song Screen, which displays 15 to 80 buttons per page. This screen includes many features that make song selection easier.
Song Buttons
Most of the Select Song Screen contains Song Buttons. There can be two, three, or more pages. The number of buttons on the screen can be set on the Options Screen. Possible choices range from 15 to 80 buttons, in 2 , 3, 4, or 5 columns.
Next to each button are two boxes. The top one contains the song title and the bottom one contains the name of the artist or whatever comments you wish to attach to the song. The text in these two boxes can be set on this screen or on the Song Settings Screen.


Page Control
At the bottom of the Select Song Screen and to the right of the button labeled 'Pick Five' is the Page Control. It has three buttons. It is used for navigation among the various pages of songs. Press the button on the left to go to the previous page, and press the button on the right to go to the next page. The page number is displayed in the center button.
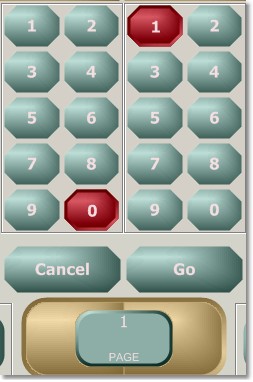
If you press the center button the Quick Navigation control will appear. This enables you to go directly to a page. Just enter the page number, from 01 to 99, and click on the button labeled 'Go' to go directly to the page. You can close the control by pressing the 'Cancel' button.
When you open the Select Song Screen it will default to whatever page you were on the last time you left the screen for the particular dance, instructor, or song you have selected since last starting the EZ Play DJ. If you want to return to page 1 just press the center button of the control.

The Action Buttons
Centered just beneath the 30 song buttons is a group of 11 buttons. These are used to select the action to perform when a Song Button is pressed. It is necessary to select the action before pressing the Song button. When the screen is first opened, the setting defaults to 'Play', which is the most commonly selected action.
Playing Songs
Set the Action to 'Play'.
To play one song, simply press the button next to the name of the song. The song will be added to the Playlist on the Main Screen, then the Select Song Screen will be closed automatically.
Playing More Than One Song
If you want the screen to remain visible after a Song Button is pressed, press the button with the Push Pin on it. It will turn red, indicating that the screen will remain visible so that you can press two or more Song Buttons. Then, to close the screen, simply press the 'Cancel' button.
Pick Several Songs at Random
If you are adventurous (or in a hurry), you might want the EZ Play DJ to do the song selection for you! There is a button with the label 'Pick One', 'Pick Two', 'Pick Three', 'Pick Four', 'Pick Five', 'Pick 10, 'Pick 15,or 'Pick 20, If you press this button, the EZ Play DJ will select songs at random from the current page of songs, all pages of songs, or all songs at or above a specified rating, and add them to the Playlist on the Main Screen. The number of songs to be added and the selection criterion can be set on the Options Screen.
Adding Songs to Either the Beginning or End of the Playlist
Normally you will want to add songs to the end of the Playlist. But you can add songs to the top of the playlist. To the right of the Page Control is a button which toggles this setting. If you want to add songs to the end of the Playlist, press the button until its label is 'End of Playlist'. If you want to add songs to the top of the Playlist, press this button until its label is 'Top of Playlist'.
If you add a song to the top of the playlist while another song is playing, it will be added just after the song currently being played.
The length of some songs cannot be determined by reading the header of the file. For CD tracks and for some song files the length can be determined. So sometimes, but not always, the EZ Play DJ can determine the length when the song is recorded or imported. Often the EZ Play DJ has to play a song from start to finish to get the length.
The EZ Play DJ will play a song to the end regardless of what it thinks the length is, but only if start time and duration are not specified on the Song Settings Screen. If the song is played straight through without speed change, start time, duration, fade, pause, stop, or fast forward, the EZ Play DJ measures the length and stores it in the database. So after the first playing, the EZ Play DJ won't have to guess at the length.
Trying Out a Song before Adding It to the Playlist
The button mentioned above with the Push Pin on it normally has just two settings. One will close the form after one song is played, and one will leave the window open so that more than one song can be selected. But there is a third setting for this button which sometimes is available.
It is convenient when creating an Editable Playlist for future use to add all songs for the Editable Playlist to the list of songs on the Main Screen, then using the Copy Playlist Button on the Main Screen to copy the songs, then paste them to the Editable Playlist. But you may want to hear a song before adding it to the list of songs on the Main Screen.
If there is at least one song in the list of songs on the Main Screen, and that song is stopped or paused, a third option will be available on the button that normally has the Push Pin on it.
Push that button until it has the label 'Playlist Mode'. Then, when you add a song to the playlist on the Main Screen, the song will begin to play and you will be presented with a dialog asking you whether or not you want to add the song to the playlist. If you answer 'Yes', it will be added, and if you answer 'No', it won't.
Limiting Random Selection for Picking Songs at Random to Highly Rated Songs
You can restrict the selection of songs selected by the Pick button to those which have a high rating. This option can be turned on or off on the Options Screen..
If this option is on and the Pick button is pressed. only songs of the specified rating or better will be added to the Playlist on the Main Screen.
Limiting Songs which appear on the Select Song Screen to Highly Rated Songs
You can restrict the songs which appear on the Select Song Screen to those which have a high rating. This option can be turned on or off on the Options Screen..
If this option is on, only songs of the specified rating or better will appear on this screen.
Recording Songs from a CD
Set the Action to 'Record'.
Then, pressing any Song Button will open up the Record Screen.
Importing Song Files
Set the Action to 'Import'.
Then, pressing any Song Button will open up the Import Screen.
Editing the Title or Artist of a Song
Set the Action to 'Title' or 'Artist', depending upon which you wish to edit..
Then, pressing any Song Button will open up the Keyboard Screen, where you can edit the title or artist.
Opening the Song Settings Screen
Set the Action to 'Edit'.
Press the Song Button for a song. This will open the Song Settings Screen for the song, where you can chance such things as rating, equalization, fade, and volume.
Deleting a Song
Set the Action to 'Delete'.
Press the Song Button for the song you want to delete. if the button with the Push Pin on it is not red, you will be asked to confirm that you want to delete the song. Press 'Yes' to delete the song or 'No' to cancel the deletion. if the button with the Push Pin on it is red, you will not be asked to confirm the deletion. This is useful when a large number of songs need to be deleted.
There is an option which is set on the Options Screen which lets you set whether or not blank buttons are deleted. If the option is enabled, you can delete blank buttons. For instance, if button 10 is blank or if it has a song on it, and buttons 11 through 13 have songs, deleting button 10 will result in the songs on buttons 11 through 13 being moved to buttons 10 through 12 if the options is enabled.
Copying and Moving Songs
The four action buttons labeled 'Copy', 'Clone', 'Cut', and 'Paste' are used for copying and moving songs to other song buttons Read Moving Music Around to see the details of how to do this.
Reset Button Color
There is an option, described elsewhere, which, if set, makes the button for a song turn red and stay red when the song is played. If the song appears on Song Button Screens for several Dance or Instructor Buttons, all of those buttons will turn red. Note that the buttons don't turn red when the song is added to the Playlist -- they turn red when the song actually begins to play.
Resetting the Red Buttons
The button labeled 'Reset Color' will turn buttons for all songs on the Song Button Screen back to the default color.
Clear Copy
Songs may be copied an pasted from one Select Song Screen or Playlist Songs Screen to another. To clear all songs from the copy buffer, press the button labeled 'Clear Copy'.
Reordering Song Button Pages
You may wish to interchange two pages of song buttons, for instance, to interchange songs labeled 16 through 30 (the second screen) with songs labeled 1 through 15 (the first screen). This can be done with the two 'Move Page' buttons, located at the left and right sides of the screen.
Press the 'Move Page' button at the right side of the screen to interchange the current page with the one following it.
Press the 'Move Page' button at the left side of the screen to interchange the current page with the one preceding it. This button will be disabled if the current page is page 1.
Note that these buttons are visible only if the Move Pages option on the Options Screen is set to Enabled.
Returning to the Main Screen
Press the button labeled 'Done' to return to the Main Screen.