|
<< Click to Display Table of Contents >> The Record Screen |
  
|
|
<< Click to Display Table of Contents >> The Record Screen |
  
|

Song Buttons
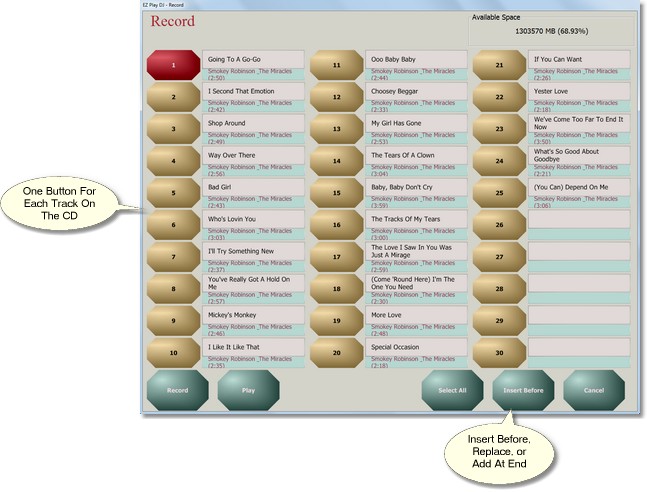
Most of the Record Screen contains Song Buttons. Note that there are 15 Song Buttons on the screen. The 15 buttons shown on the screen comprise Page 1 of the Song Buttons. But there can be more than one page, if the CD has a lot of tracks. The buttons are numbered 1 to 15 on the first page of songs, 16 to 30 on the second page of songs, and so on.
Next to each button are two boxes. The top one is for the song title and the bottom one is for the name of the artist. The text in these two boxes can be set automatically if the CDDB feature is enabled and the PC is connected to the internet. If it is not, the titles will be loaded with generic titles (e.g., 'Track 1'), and the artist fields will be left blank.
Page Control
At the bottom of the Record Screen and to the right of the button labeled 'Play' is the Page Control. It will be present only if the CD has more than 15 tracks.
The Page Control has three parts -- a button on the left, a display panel in the center, and a button on the right. It is used for navigation between pages of songs on the CD. Press the button on the left to go to the previous page, and press the button on the right to go to the next page. The page number is displayed in the display panel.
Selecting One or More Songs
You can select or deselect a song by pressing the Song Button. The button will be red when the song is selected.
You can select all songs by pressing the Select All Button at the bottom of the screen.
Playing a Song
Before loading a CD track into the EZ Play DJ you might want to hear it. It is possible to play a track directly from the CD without first loading it into the EZ Play DJ and assigning it to a Dance Button or to an Instructor or Student Button.
Press the button labeled 'Play' on the record screen to hear the song. This button is enabled only if exactly one track is selected. You can press the button labeled 'Cancel' to stop playing the track.
Selecting What Buttons on the Select Song Screen are to Receive the Songs
To the left of the button labeled 'Done' is the button which controls the assignment of songs to Dance Buttons on the Select Song Screen. The button will have one of three labels, 'Insert Before', 'Replace', or 'Add At End'. The following example illustrates how these three methods work.
Say we have songs on buttons 1, 2, 5, and 6 on a Select Song Screen. We select the 'Record' action button on the Select Song Screen. We load a CD into the PC and press song button 4 on the Select Song Screen. The Record Screen appears, and we select two songs to record from the CD.
If we are in 'Insert Before' mode, the songs at positions 5 and 6 will be pushed back to positions 6 and 7, respectively, and the two new songs will be put at positions 4 and 5.
If we are in 'Replace' mode, the first new song will be put at position 4. You will be prompted to confirm whether or not the song at position 5 should be replaced by the second new song. If you press 'Yes', it will be replaced.
If we are in 'Add At End' mode, the two new songs will be put at positions 7 and 8.
Press the button until its label is the desired mode, 'Insert Before', 'Replace', or 'Add At End'.
Recording One or More Songs
Once you have selected the mode for song assignment to buttons and have selected the songs to record, press the button labeled 'Record'. The songs will be recorded and assigned to buttons.
After the songs have been recorded, the Record Screen will close, and you will be returned to the Select Song Screen.
Returning to the Select Song Screen
Press the button labeled 'Done' to return to the Select Song Screen.